What is Notion? And how to use it
Notion can be your word processor, your database, your Kanban board—even your second brain. But first, you have to know how to use the app's basic building blocks. It's the whole "you have to learn to walk before you can run" deal.
Here, I'll walk you through the basics of how to use Notion, so you can get the most out of it.
Table of contents:
What is Notion?
How to use Notion at a glance
How to manage your Notion sidebar
How to share pages and collaborate in Notion
How to use databases in Notion
Notion FAQs
What is Notion?
Notion is, at the core, a note-taking app. But really, there's no one category that accurately captures everything Notion can do. Because if you know how to use the app's basic building blocks, it functions as so much more than just a place to jot down your thoughts—it becomes more of an all-in-one workspace.
Notion provides a single space for organizing everything from lead data to to-do lists to company wikis, allowing you to turn it into a CRM, a project management tool, and with the help of Notion AI, a writing partner.
How to use Notion at a glance
To start with a blank page, click Add a page in the sidebar. If this option isn't visible, click the Add a page icon, which looks like a plus sign (+).
Or click Templates and choose from over 10,000 templates to help you kickstart your work.
To add content to your page, such as text, images, and videos, you need to add a block. Blocks are the way you build anything in Notion. There are five basic building block categories (and over 500 block types):
- Text blocks
- Inline blocks
- Media blocks
- Embed blocks
- Database blocks
Text blocks
A text block is the most basic of basic building blocks, and it's exactly what it sounds like. It includes body text, headings, bulleted lists, toggles (collapsible text boxes), and callouts.
To add text in Notion, click anywhere on the page and start typing.
Need to style your text? Here are all the ways you can format your text in Notion:
Slash commands: Enter the Turn into slash command at the beginning of a text block: /turn [format]. For example, /turn heading 1 or /turn quote. If you forget what formatting options are available to you, no problem—once you start typing /turn, a dropdown will automatically appear with your options.
Keyboard shortcuts: Highlight the text you want to format and use your keyboard shortcut.
Markdown: Use Markdown while typing or at the beginning of a new block to apply common formatting styles, such as bold, italics, and bulleted lists.
Block menu: Let's say you want to fill your text block in with color. Click the six-dot menu icon next to your text block, and select Color. The block menu will also give you access to many of the same actions you can take using slash commands or keyboard shortcuts.
Inline blocks
Inline blocks allow you to display blocks of content, including dates, mentions, emoji, and mathematical equations, within another block.
If you want to mention a person, page, or date, enter @, and select from the dropdown that appears.
Media blocks
Media blocks are for images, files, video, and audio—all of which you can interact with directly from your Notion page.
The easiest way to add a media file is to drag and drop it directly onto your Notion page. Alternatively, you can use the slash command for the media file you want to upload (for example, /file or /video). Hover over any media file, and a floating toolbar will appear with shortcuts to commonly used tools, such as Comment, Caption, and Download.
Embed blocks
Embed blocks contain content pulled in from another website. For example, a driving route saved in Google Maps or a YouTube video.
There are countless things you can embed within Notion—from Loom and Zoom recordings to files stored in the cloud. To embed content onto your page, use your slash command (for example /map or /youtube), or enter /embed and scroll through the available options.
Database blocks
Put simply, database blocks are collections of pages in Notion. You can visualize your database as a table, board, list, timeline, calendar, or gallery. Each layout contains all the same features—the only difference is how your information is displayed.
How to rearrange blocks in Notion
Notion makes it really easy to rearrange content.
Select the block you want to move. Or highlight multiple blocks to move them as a group.
Click the block menu icon. If you highlighted multiple blocks, you can click any block menu within your selection.
Drag and drop your selection to a new spot. Note: As you drag, a thin blue bar will appear to indicate where the block will exist once you let go of your cursor. A horizontal bar means your content will go above or below surrounding content; a vertical bar means it'll go next to surrounding content in a column layout.
How to manage your Notion sidebar
Notion pages live within Teamspaces (more on that in a bit), Shared, or your own Private space—all of which are accessible via your sidebar. Note: Depending on your workspace structure, you may see one or all of these sections.
Every top-level page can host an infinite number of subpages. And while you could easily navigate to a subpage from the sidebar, Notion provides another useful option: it automatically populates the names of the subpages in your top-level page. This is great if you want to scan through a list of subpages without the distraction of other irrelevant pages.
Need easy access to a specific page? Add it to your favorites.
- Open the page you want to add to your favorites.
- Click the Add to favorites icon, which looks like a star, at the top of the page.
A new Favorites section will appear at the top of your sidebar with your starred pages. Note: If you starred a top-level page, all of its subpages will automatically appear in your Favorites as well.
How to share pages and collaborate in Notion
There are three main ways to share pages and collaborate in Notion:
- Share individual pages with others
- Publish pages to the web
- Share pages in teamspaces
How to share individual pages with others
- Open the page you want to share.
- Click Share at the top of the page.
- Enter the name or email address of the person you want to share the page with.
- By default, anyone you share the page with can edit and share with others. To change this, click the dropdown next to Full access, and select the right permissions.
- Click Invite.
Alternatively, you can share a link to your page.
- Open the page you want to share.
- Click Share at the top of the page.
- Click Copy link, and share it as you normally would.
Once you share the page, it'll automatically populate in a new Shared section in both of your sidebars.
How to publish pages to the web
Let's say you want to turn all your journal entries into a public blog. Or maybe you've crafted a portfolio that you want to share with anyone with internet access.
- Open the page you want to publish.
- Click Share at the top of the page.
- Click the Publish tab.
- Click Publish. Note: Your page (and any of its subpages) will go live immediately.
- Click settings to change the domain name.
If you want your page to be searchable on the web, click the toggle next to Search engine indexing. Update all other permission settings as needed.
How to share pages in teamspaces
Depending on your Notion workspace, you may or may not already be part of a teamspace (collaborative workspaces). Before you can automatically create and share pages with members of a teamspace, and vice versa, you need to create or join a teamspace.
- How to create a new teamspace
- Click the New teamspace icon, which looks like a plus sign (+) next to Teamspaces.
- In the popup that appears, enter your teamspace name, add a description (optional), and choose who can see and join your space. Note: If you set your teamspace to Closed, anyone will be able to see that the teamspace exists, but they won't be able to view the pages inside of it.
- Click Create teamspace.
Now you have a dedicated space in Notion for your team to create and share pages.
How to manage members in teamspaces
Let's say someone has requested to join your closed teamspace. A notification will appear in your Notion inbox where you can approve or deny the request.
- Click Updates in the sidebar to access your inbox.
- In the request notification, click Approve or Decline.
If you want to add or remove members from your teamspace, or manage member permissions, click the ellipsis (...) next to the teamspace name, and then select Teamspace settings.
How to use databases in Notion
Databases in Notion make it easy to store, organize, and visualize information. You can think of each database entry as one of the basic building blocks we reviewed earlier. For example, an image can be an entry. So can an entire page.
Before we get into creating a database, however, it's important to understand all the ways you can visualize your data:
Table: This gives you a high-level overview of all the content in your database.
List: This is a good option for listing a collection of pages, such as journal entries or meeting notes.
Calendar: This displays your pages as cards in a calendar.
Timeline: This displays your pages on an infinitely scrolling horizontal line, which is helpful for presenting workflows that involve date ranges or multiple consecutive steps, like a product launch.
Gallery: This is the most visual option, giving you a preview of the content within each data.
Board: This is a Kanban board. It groups your content by category—for example: In progress, Review, and Done—making it a great option for task management.
How to create a database in Notion
You can create a database as its own page or inline with other content on an existing page. The setup is more or less the same either way. 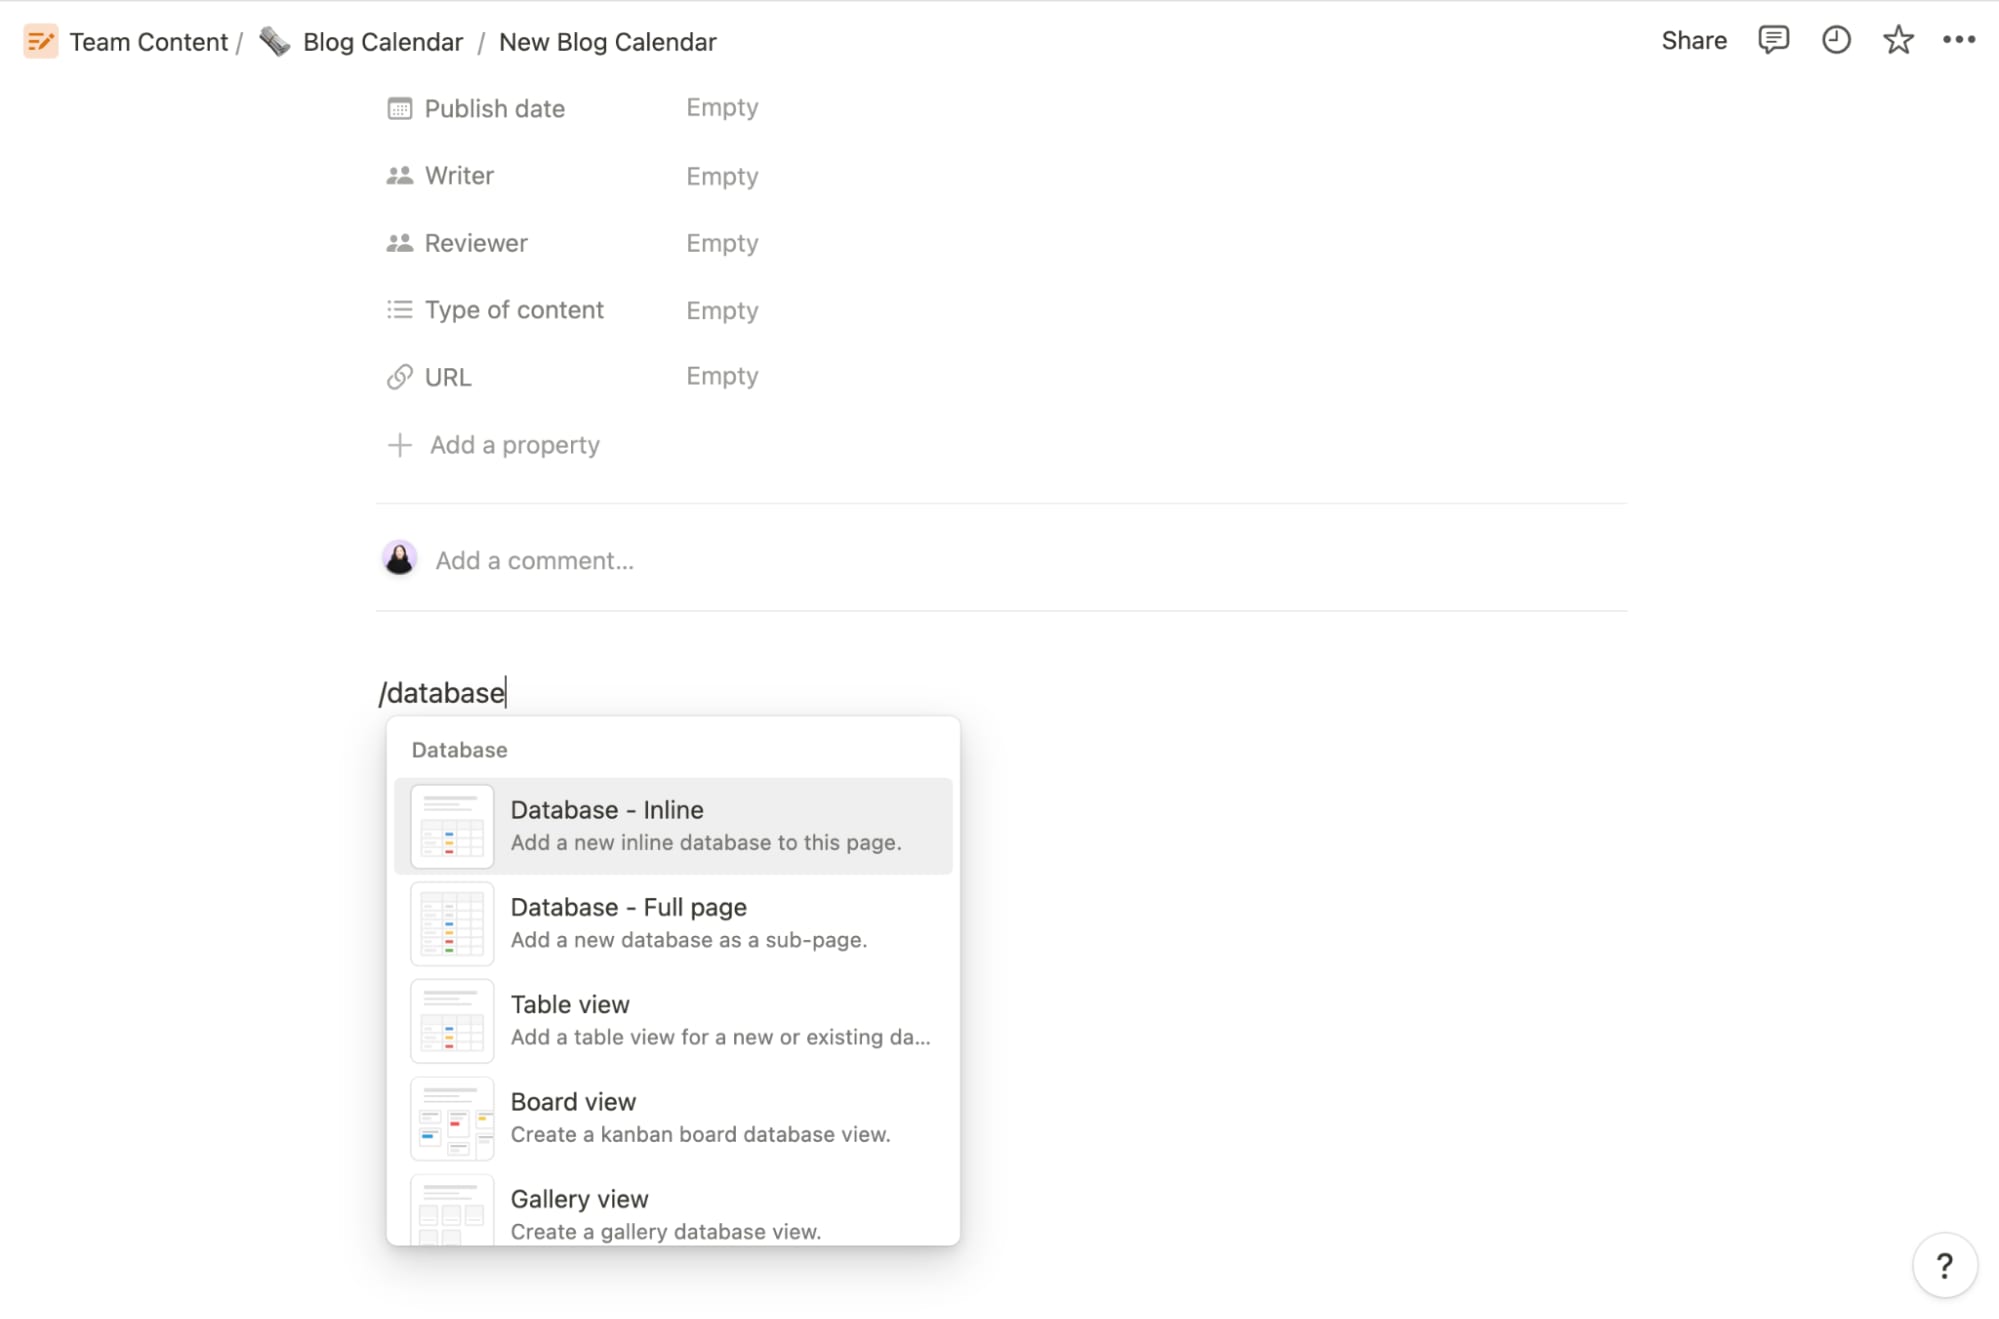
- Open a new or existing page in Notion.
- Enter the slash command /database to create a new database, and select Database - Inline or Database - Full page. By default, Notion will display an inline database as a table, but you can easily change this.
- Give your database a name and add your entries.
Notion FAQs
We've covered a lot of ground in this beginner's guide. If you still have questions, check out the answers to these frequently asked questions.
Is Notion free?
Notion offers a free plan that includes all the note-taking functionality you need to organize your personal life. I have a free account for personal use, and it's been more than enough to plan vacations, track my reading goals, and coordinate a friend's wedding.
The key feature that's not included in a free Notion plan: Notion AI. For that, you'll have to pay an additional $8/user/month.
Does Notion work offline?
Notion doesn't have a true offline mode. But if you want to use Notion without an internet connection, there's a workaround.
Pre-visit and fully load the pages you want to view or edit online. Once you're offline, you'll still be able to make basic edits to those pre-loaded pages—for example, add blocks, change some properties, and change database items—but you won't be able to do more advanced actions like mention a person or page, use database templates, or load embedded images.
Once your internet connection has been restored, Notion will automatically sync the data you entered while offline—just don't close your Notion pages until that internet connection is restored.

.png)
Comments
Post a Comment